Step by step configuration for Teams
Prerequisites
- JIRA Service Desk project configured
- Teams for JIRA Service Desk installed and licensed
Configuration
After installation of Teams for JIRA Service Desk a couple of steps have to be taken. The goal of this guide is to setup a service desk project with Teams.
Basic configuration
Before anything else, Teams require some basic configuration:
- Browse to the JIRA administration → add-ons
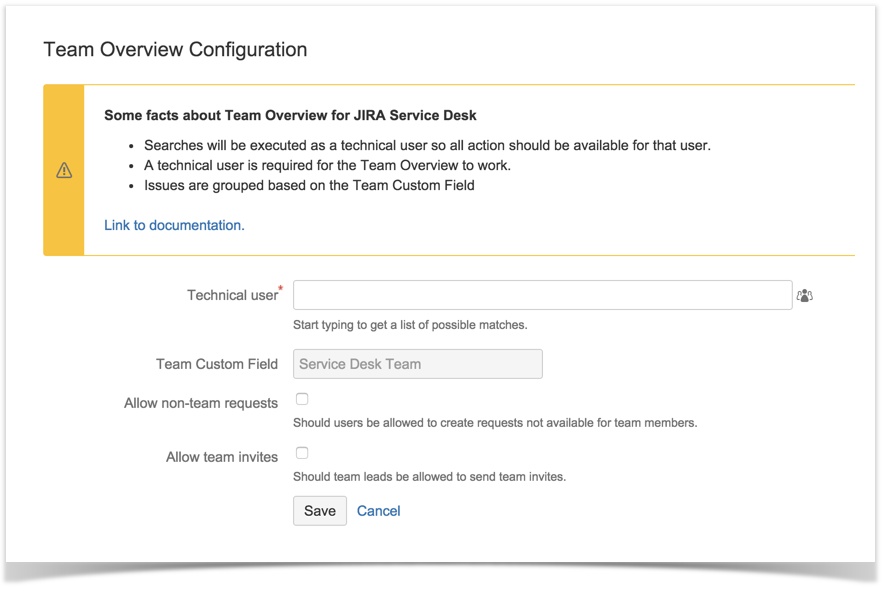
- In the Teams for Service Desk section, choose configuration.
The following options need to be configured:
Option Description Technical User Teams require an user who is an agent for your Service Desk projects and allowed to browse the project.
This user is being used for some requests, where Service Desk Users do not have the proper permissions or access.Team Custom Field This Custom Field is automatically generated when you installed the add-on and is being used to identify for which team an ticket is. This custom field needs to be placed on your screens and request types mapping (more on this later) Allow non-team requests When enabled, customers are given the choice to share the ticket with team or keep it private. Defaults all tickets created are shared within the team. Allow team invites When enabled, team leads are able to invite new team members using their e-mail address
Team setup
After setting up the basic configuration, we have to create our teams:
- Browse to the JIRA administration → add-ons
- In the Teams for Service Desk section, choose Teams.
- In the upper right corner, click Add Team to create your first team
- Provide a name for your team, ie: The A Team
- Users and Groups can be added to the team using the inline edit
Select your team members and team lead and choose Update to save the changes
Everybody in the team is allowed to view and choose to participate team tickets.
Create more teams if required.
A team lead is allowed to alter the team members using the Service Desk Customer portal.
After setting up your teams, the next step is configuring your screens and request types.
Screen and Request Type setup
Once your teams are setup, it's important to update the configuration of your project screens and Service Desk request types. We're going to add the Service Desk Team custom field to those. This is required so that we can register for which team a certain request is made.
Before a field can be added to your request types, it needs to be on the create screen if the mapped issue.
Example: In our environment we have "Report a system problem" request type, which is mapped to the "Incident" issue type in JIRA.
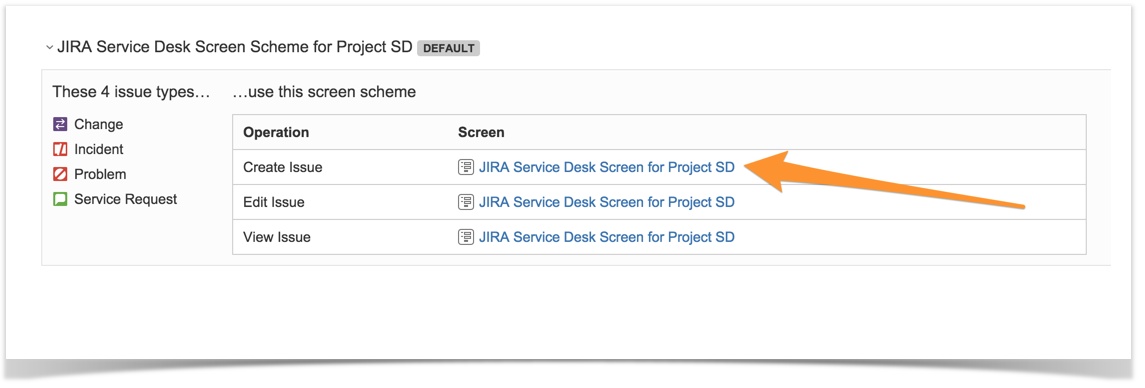
The "Incident" create issue operation uses the "JIRA Service Desk Create Screen".
Updating your screen
- Browse to the Project Administration of your project
- Choose Screens from the sidebar
- Click on the screen next the Create Issue operation
- From the dropdown select Service Desk Team to add the field to the screen.
- If required, use these steps to also add the custom field to your edit and view screens, this would allow your agents to view or edit the team on the issue.
Update your Request Types
- Browse to the Project Administration of your project
- Choose Request Types from the sidebar
- Click Edit Fields of the first request type
- Click Add a field and select Service Desk Team
You can rename the field for your customers
The field will not always show for your customer, it's hidden if there is nothing to choose from. ie: the customer is only in one team.
- Repeat these steps for other Request Types
Change & reindex
The setup should be complete now! Of no tickets are shown in the team overview one of the following could be true:
The Service Desk Team custom field is not on the screens, or do not have any value
If the Service Desk Team custom field doesn't has value, it's considered as a private ticket and will not be shared between team mates
The customer is not in the correct team
JIRA needs to be re-indexed so that the Service Desk Team field is searchable.


